Explore our expert-made templates & start with the right one for you.
Flattening Array Fields into Separate Rows
Use the SQLake UNNEST Operation to Flatten Arrays Easily
If your source data contains array elements, it’s common to need to flatten these array elements into separate rows. One reason for this could be to make each of your array elements queryable as a separate key:value pair; another could be so you can aggregate a result set by an individual array element.
Consider an e-commerce data set, where each event correlates to an order. For each order, there may be multiple items, with each item having information stored within an array. The JSON for such an order would look like this:
{
    "orderId": "g63hIobSnY",
    "cart": {
        "items": [{
            "category": "Toys & Games",
            "itemId": 12340,
            "name": "Airplane Building Kit",
            "quantity": 3,
            "unitPrice": 364.33
        }, {
            "category": "Arts & Crafts",
            "itemId": 15787,
            "name": "Decorate This Journal Toy",
            "quantity": 1,
            "unitPrice": 375.68
        }]
    }
}
If we want this dataset to have a single row, then for each item in the array we must flatten this array via transformation. In SQLake, if your transformation requires flattening you can use the UNNEST() command within a transformation job, as shown in the example below. (Notice that the transformation SQL is wrapped in the UNNEST()to create a flattened result set.):
CREATE SYNC JOB flatten_items
   START_FROM = BEGINNING
   RUN_INTERVAL = 1 MINUTE
   ADD_MISSING_COLUMNS = TRUE
AS INSERT INTO default_glue_catalog.database_e809da.orders_flattened MAP_COLUMNS_BY_NAME
UNNEST(
   SELECT
       orderid AS order_id,
       data.items[].itemid AS item_id,
       data.items[].name AS item_name,
       data.items[].quantity AS item_quantity,
       data.items[].unitprice AS item_unitprice,
       data.items[].discountrate AS item_discountrate,
       data.items[].category AS item_categories
   FROM default_glue_catalog.database_e809da.orders_raw_data
   WHERE $event_time BETWEEN RUN_START_TIME() AND RUN_END_TIME()
);
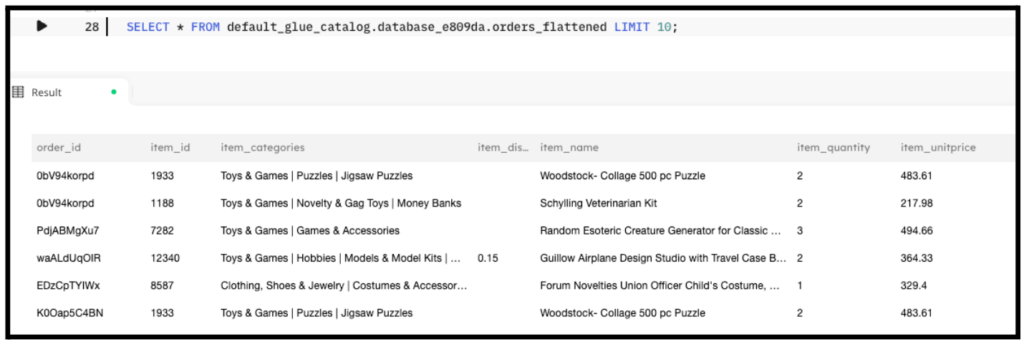
The results of running this transformation can be seen in the following screenshot. Notice that each item_id is now its own row in the table.
Using SQLake to Flatten Array Fields
There are four simple steps involved:
- Create a connection to Amazon S3 with sample data
- Create a staging table and job to ingest raw data
- Create a target table to hold flattened data
- Create transformation job that uses UNNEST() to flatten the array elements
Let’s walk through the steps.
1. Create a connection to Amazon S3 with sample data
To help demonstrate how to use UNNEST() to flatten array elements into separate rows, we will use sample data hosted by Upsolver and made available through S3.
Create a connection to S3. The IAM role in the following snippet is provided for you to access the data in S3.
CREATE S3 CONNECTION upsolver_s3_samples
   AWS_ROLE = 'arn:aws:iam::949275490180:role/upsolver_samples_role'
   EXTERNAL_ID = 'SAMPLES'
   READ_ONLY = TRUE;
2. Create a staging table and job to ingest raw data
Create a staging table in the data lake to hold the raw data. This step is simple and you don’t need to know the raw schema; SQLake automatically detects it and updates the AWS Glue Data Catalog.
Create the staging table in the AWS Glue Data Catalog. Note that you will need to update the <db_name> to use your database name:
CREATE TABLE default_glue_catalog.database_1913f9.sales_info_raw_data()
PARTITIONED BY $event_date;
We’re using the $event_date system column to partition the staging table. This column contains the original date the event was generated (if available in the event), or one that SQLake auto-generates when the event is ingested.
Once the table is created, we create an ingestion job that copies the raw events from the source S3 bucket into the target table. SQLake converts the data to columnar format, partitions it, and manages it over time to ensure best query performance.
Create the ingestion job to copy raw data into the target table:
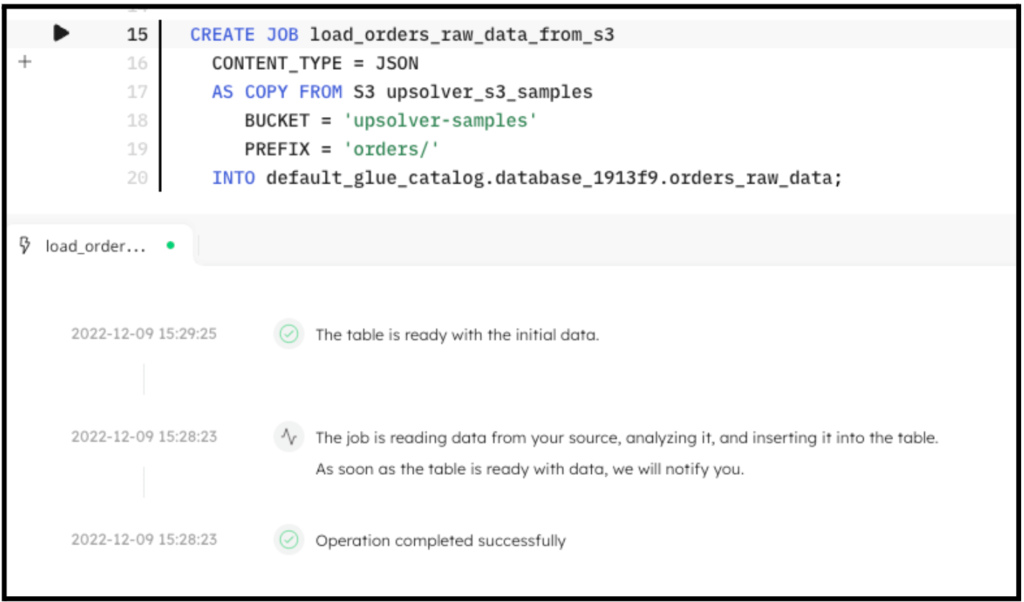
CREATE SYNC JOB load_orders_raw_data_from_s3
  CONTENT_TYPE = JSON
  AS COPY FROM S3 upsolver_s3_samples
     BUCKET = 'upsolver-samples'
     PREFIX = 'orders/'
  INTO default_glue_catalog.database_1913f9.orders_raw_data;
The following screenshot shows the execution of the ingestion job. In the console, SQLake reports the progress and notifies you when the data is available to query.
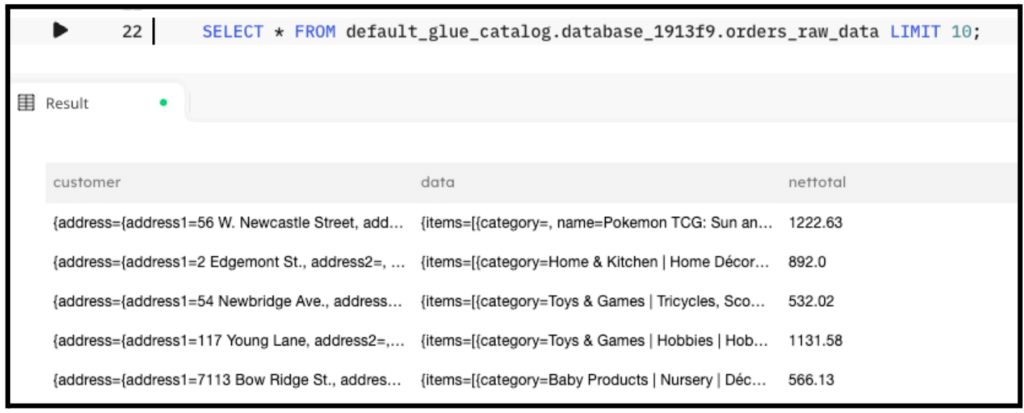
You can easily query the staging table directly from the SQLake worksheet. For example:
SELECT *
FROM default_glue_catalog.database_1913f9.orders_raw_data
LIMIT 10;
The following screenshot shows the results of the query. You can see the data.items[] array as a column within this table. We will use this in the next step.
3. Create a target table to hold the flattened data
Now that the raw data is staged, create the target table in the AWS Glue Data Catalog to hold the enriched data.
Create the target table:
CREATE TABLE default_glue_catalog.database_e809da.orders_flattened (
  order_id string,
  item_id string,
  partition_date date
)
PRIMARY KEY order_id, item_id
PARTITIONED BY partition_date;
Notice we’re defining a multi-part primary key, using both order_id and item_id, item_id coming from within the array.
4. Create a transformation job that use GEO_IP to enrich the data
This is the step where the interesting work is performed. We create a transformation job that uses the UNNEST() command to flatten the array into separate rows. The transformation SQL itself is simply referencing the array fields to be flattened, such as data.items[].itemid.
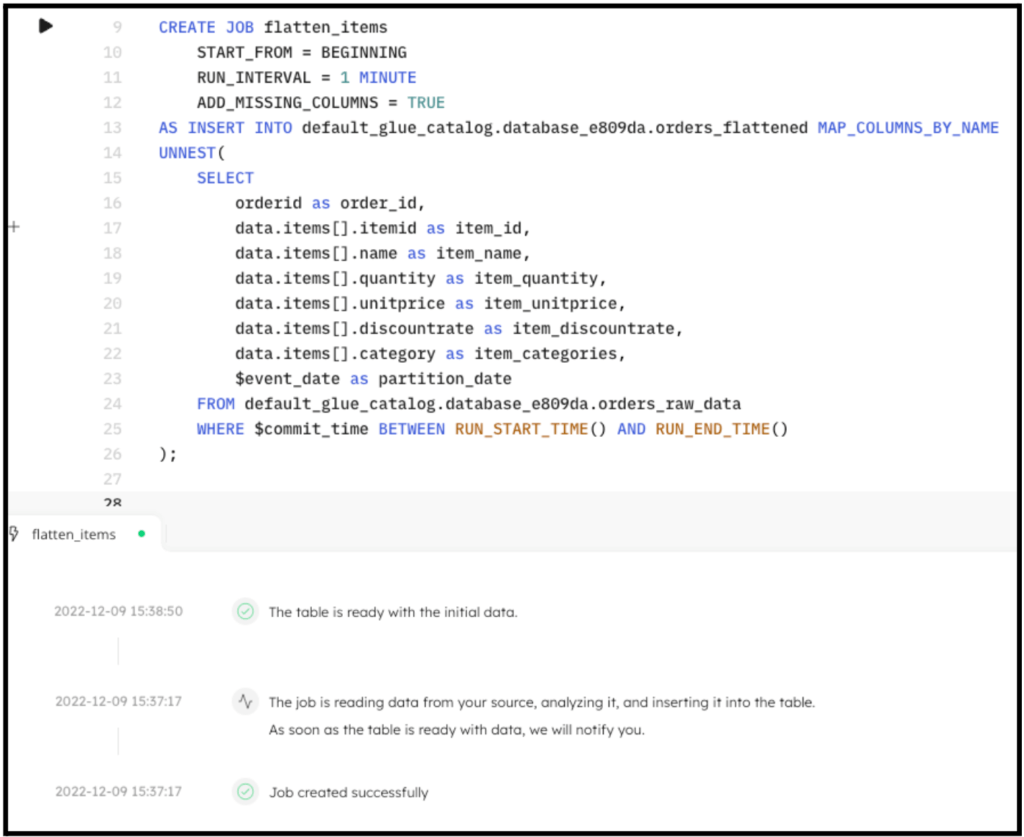
Create the transformation job:
CREATE SYNC JOB flatten_items
   START_FROM = BEGINNING
   RUN_INTERVAL = 1 MINUTE
   ADD_MISSING_COLUMNS = TRUE
AS INSERT INTO default_glue_catalog.database_e809da.orders_flattened MAP_COLUMNS_BY_NAME
UNNEST(
   SELECT
       orderid AS order_id,
       data.items[].itemid AS item_id,
       data.items[].name AS item_name,
       data.items[].quantity AS item_quantity,
       data.items[].unitprice AS item_unitprice,
       data.items[].discountrate AS item_discountrate,
       data.items[].category AS item_categories,
       $event_date AS partition_date
   FROM default_glue_catalog.database_1913f9.orders_raw_data
   WHERE $event_time BETWEEN RUN_START_TIME() AND RUN_END_TIME()
);
By executing the previous code in SQLake, the job is created. After a couple minutes the data is fully transformed and ready to query. The following screenshot shows the execution of the job:
Query the target table to see the results of the flattening:
SELECT *
FROM default_glue_catalog.database_e809da.orders_flattened
LIMIT 10;
The output of the query looks similar to the following screenshot:
Summary
That’s it!
In only a few minutes and a few lines of SQL you were able to ingest data from S3 into the data lake and flatten an array into separate rows using the UNNEST() command. You can now use this flattened table for reporting, analytics, and/or additional downstream transformations. SQLake makes it easy to work and extract meaning from data quickly. You can find more useful functions in the documentation page.
Get started today for free with sample data or bring your own.
Discover how companies like yours use Upsolver
Data preparation for Amazon Athena.
Browsi replaced Spark, Lambda, and EMR with Upsolver’s self-service data integration.
Read case studyBuilding a multi-purpose data lake.
ironSource operationalizes petabyte-scale streaming data.
Read case studyDatabase replication and CDC.
Peer39 chose Upsolver over Databricks to migrate from Netezza to the Cloud.
Read case studyReal-time machine learning.
Bigabid chose Upsolver Lookup Tables over Redis and DynamoDB for low-latency data serving.
Read case study
Start for free - No credit card required
Batch and streaming pipelines.
Accelerate data lake queries
Real-time ETL for cloud data warehouse
Build real-time data products


